One of the pleasures of life is to open a brand new jar of peanut butter. The smooth creamy surface, pristine and untouched and smelling so nutty and tempting it’s like a blank canvas. What will become of this little bottle of mushed up nuts? Today you’ll be grabbing one of your favorites for this delicious recipe. I hope you have a jar or two! Get your rubber spatula and let’s dig in!
Today we’ll be making Peanut Butter Cookie Cheesecake Bonnes Bouches. Get your mouth around that one! What is a Bonne Bouche? I hear you asking. Yes it is French and translated it means “a delicious morsel or mouthful”. This yummy recipe definitely qualifies. A crumbly peanut butter cookie crust beneath a tender layer of peanut buttery cream cheese filling, topped with whipped cream and half a mini Reeses peanut butter cup. Mmm…let’s get started!
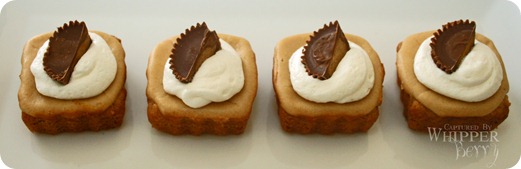
Begin by making the peanut butter cookie crust.
Peanut Butter Cookie Crust
Adapted from Soft Peanut Butter Cookie by Natalie Gardner
-
½ c. butter, softened
-
½ c. peanut butter
-
½ c. white sugar
-
½ c. brown sugar
-
¼ t. vanilla
-
1 egg
-
*1¼ c. flour
-
*¾ t. soda
-
*¼ t. salt
1. Cream all but starred items. Sift starred items and add to peanut butter mixture.
2. Using a Tablespoon, scoop dough into well greased mini cheesecake pans. (You want the ones with little lift out bottoms). Don’t overfill! Unfortunately you will have extra dough. I’m sure you can think of things to do with it.
3. Bake in a 350 degree oven for about 5 minutes. The dough will puff up and begin to brown around the edges looking awfully scrumptious.
4. Resist the urge to eat it right now! Instead, use your Tablespoon to press down the puffiness making a well for the heavenly peanut butter filling.
Now, mix up the filling:
Peanut Butter Cream Cheese Filling
12 oz. cream cheese (1 ½ blocks) softened
¾ c. sugar
½ c. creamy peanut butter
2 large eggs at room temperature
¼ c. sour cream
1 ½ t. vanilla
1. Beat cream cheese and granulated sugar in a large mixing bowl with an electric mixer on medium speed until smooth, about 2 minutes. Beat in the peanut butter. Scrape down the sides of the bowl with a rubber spatula, then beat in the eggs, one at a time, making sure each is thoroughly incorporated before adding the next. Finally, beat in the sour cream and vanilla.
2. Use your Tablespoon to fill the wells. Fill straight to the top and pile just a bit on top without going overboard. Your cheesecakes will puff while cooking and then sink down a bit.
3. Put your pans into a 350 degree oven. If you’re using the tiny squares like I did, you’ll have less filling and a wider surface area. Cook for only about 13 minutes until edges are set, but center is still a little jiggly. For the mini rounds, cook at least 15 minutes, but probably more like 17 minutes, watching and testing so as not to overcook. I got nervous and took them out too early resulting in raw centers. Still yummy, but not as good as they could be.
4. Cool on the counter top, then press up from the bottom and lift your little cakes out of the pan. Put them on a plate and into the fridge. I am an impatient woman, but these really are even better if you wait till the second day.
5. Now they’re ready to be properly topped and consumed with relish. You can make your own whipped cream, or use a scoop of Cool Whip to top your cakes. Refrigerate your Reese's Cups to keep them from being too soft and squishing when you slice them. Slice one cup and press it gently into the whip. Voila! You have a fancy bonne bouche that will make you sigh with satisfaction. Now whip a batch for your next party or book club meeting and tell me they don’t go flying off your fancy platter.
Christene
 Come meet Christene, our newest WhipperChick. We are so excited to have her join our team!!


