home style photo dish weddings tables shop chicks

Thursday, October 7, 2010

{Halloween Table} Monster Mash

By popular demand, here are some of the tasty treats from our Halloween table that we posted on Monday.  We promise all the “spooks” at your party will gobble up every bite of this delicious treat!

WB 057

Monster Munch

  • 7 Squares almond bark, divided
  • 1 ½ cups pretzel sticks
  • Orange food coloring
  • 2 cups graham cereal
  • ¾ cup Halloween M&M’s
  • ¾ cup mini marshallows
  • ½ cup chocolate sprinkles

Melt 2 sq. almond bark in small microwave bowl for 1 minute. Remove and stir. Repeat for intervals of 15 seconds until melted thoroughly.

Stir in pretzels until coated. Spread out on wax paper to set.

Repeat the melting instructions for the final 5 sq. of almond bark. Stir in orange food coloring until it’s a  bright orange.

Place cereal in a large bowl and cover with half the orange almond bark. Stir until coated evenly. Add chocolate pieces, marshmallows, and remaining bark. Stir in pretzel sticks. Spread out on waxed paper in small clusters. Sprinkle with chocolate sprinkles. Let set.

After it’s partially set, it can be divided into cups, or drizzled with melted chocolate or colored almond bark for a beautiful effect.

Makes about 5 cups.

Happy Munching!

Jamie Signature 

whipperberry 

Wednesday, October 6, 2010

{Halloween Table} Spooky Pear Ghosts

For more Halloween fun it doesn’t get much cuter than these ghostly haunts…

WB 044

Ghoulish Pears

  • 4 wooden skewers or craft sticks
  • 4 medium pears
  • 9 sq. almond bark or white chocolate chips
  • Mini Chocolate chips or melted chocolate

Insert wooden sticks into the stem ends of pears. Melt bark according to package directions. Dip pear into bark. Spoon over the top to cover completely. Remove excess by scraping the pear bottom across the bowl rim. Place on waxed paper and allow to set for 1 minute. Decorate with mini chips. Repeat with remaining pears. Chill until firm.

Jamie Signature

whipperberry

Friday, October 1, 2010

Lemon Curd Cheesecake

Mini Lemon Curd Cheesecake_edited-1

It would seem that lemons are made from sunshine. They soak up the rays until their skins turn a bright cheery shade that radiates warmth and happiness. These delightful pucker-fruits add a bright flavor to every dish. An All-Star pair, lemons and sugar combine to heavenly deliciousness in lemonade and lemon bars to name just a few enjoyable concoctions. There’s no end to their adaptability. Consider them stirred together into yummy cheesecake batter and infused in the crust. They transform this luscious cake with their lemony-sweet goodness into a treat so good you have to share! Yeah, it’s that good! Now that I’ve got your attention, let’s get started…..

Lemon Curd Cheesecake {click here to print the recipe}

1_edited-1

Crust

  • 1 box Lemon Cake Mix
  • ½ c. butter, softened
  • 1 t. grated lemon peel

Filling

  • 2 (8oz) pkgs cream cheese, softened
  • ¾ c. sugar
  • 3 (3.5 oz) containers ready to eat lemon pudding (from 4-pack container)
  • ½ c. sour cream
  • 3 eggs
  • 2 c. frozen (thawed) whipped topping

Heat the oven to 300 degrees.

You’ll begin with a lemon cake mix. Before you start, reserve ¼ cup of the mix for later. Now mix in the butter and lemon zest until crumbly.

Spray your pans with cooking spray and then scoop some of the crust mix into each of your pans. We used these fun 3-inch cake pans with a lift out bottom. They’re awesome! Press the crust mix down into the bottom and up the sides a bit. This recipe will make about ten 3-inch cakes. Reserve the remainder of your crust mix in a small bowl while you stir up the cream cheese batter.

Combine reserved cake mix, softened cream cheese, pudding, sugar and sour cream on medium speed until smooth and creamy. Beat in eggs, one at a time, until mixed. It will look heavenly and it will taste even better. Resisting the urge to dip your fingers in the batter, spoon the mixture in on top of your crusts, filling each cake up about two-thirds of the way. The filling will rise and then sink back down as it cools.

Bake in a preheated oven for about thirty minutes. Begin checking around 25 minutes. You want each cake to be firm around the edges but still a bit jiggly in the center. Remove from the oven.

WB 087

Cool on the counter for about twenty minutes and then refrigerate for twenty more before loosening and removing from the pans. You’re going to want to pop them out before then, but trust me, it will only end in tears! Let them firm up completely in the fridge before working your magic. During this time, keep your batter in the fridge, lightly covered until your pans are free to make the remaining cheesecakes. Then repeat the process until you’ve used up all your batter.

Once removed from the pans, cover and refrigerate your cakes 4 hours or overnight…if you trust your husband not to sneak in and “taste test” them for you. It’s your call.

When you’re ready to serve, top with one tablespoon each of lemon curd. Pipe on whipped cream and top with a half slice of lemon. Now call your girlfriends over for lunch and wow them with this little nibble of sunshine that will have them raving! Enjoy!

Signature

WhipperBerryLogo

Monday, September 27, 2010

Cinnamon Rolls

There’s nothing more enticing than being tickled by the scent of steaming, buttery cinnamon wafting through your home. Either waking to it’s goodness, or at the close of the day, it takes willpower of steel to reject this sinful temptation. 

Cinnamon Rolls

Cinnamon Rolls

  • ½ c. warm water
  • 2 pkg. dry yeast
  • 2 Tbsp. sugar
  • 1 (3½  oz.) pkg. instant vanilla pudding
  • ½ c. margarine or butter, melted
  • 2 eggs, beaten
  • 1 tsp. salt
  • 8 c. flour

Filling:

  • ½ c. margarine or butter, melted
  • 1 c. brown sugar
  • 1 c. while sugar
  • ¼ c. flour
  • 1 ½ Tbsp. cinnamon

Frosting:

  • 8 oz. cream cheese, softened
  • ½ c. margarine or butter, softened
  • 1 tsp. vanilla
  • 3 c. powdered sugar
  • About 1 Tbsp. milk (just enough to fluff frosting)

Directions:

In a large bowl, combine water, sugar, and yeast. Stir until dissolved. Set aside

In a large bowl, prepare pudding mix according to directions. Add margarine, eggs, and salt. Mix well, then add the yeast mixture. Blend. Gradually add flour and knead until smooth.

Place in a large, greased bowl. Cover and let rise until doubled. Punch down and allow to rise again. Roll out on a lightly floured surface to about 34x21 inch size.

Melt butter for filling and brush on rolled dough. Mix sugars, flour, and cinnamon together and sprinkle over buttered dough. Roll dough up tightly. With a knife, put a notch along the roll every 1 to 2 inches. Use thread or a sharp knife to cut roll. Place on greased baking sheet about 1 to 2 inches apart. Cover and let rise until doubled. Bake at 350 for 15-20 min.  Remove when golden brown. *If the rolls start to brown too quickly on top or the edges, cover loosely with foil to continue baking until the middle seems done. Frost while still warm.

Note: You can make these the night before. Prepare recipe and allow to rise once. Punch down and cover, putting in the refrigerator overnight to slowly rise. In the morning roll out dough and finish. They also freeze well once they’ve been baked. Warm in the microwave.

Jamie Signature

Jamie

I am super excited to introduce you to Jamie, our newest contributor to WhipperBerry!  Click on this link to learn more about her and what she has to bring to WhipperBerry.


WhipperBerryLogo

Wednesday, September 15, 2010

Petite Éclairs in a Jar

Harvest time is upon us. I have fond memories of our kitchen counter crowded with tall canning jars glistening with shiny red tomatoes, long slender green beans and jiggly jellies all ready to be tucked into our pantry for the cold winter months. Apples, pears and strawberries were peeled, chopped and boiled into sauces and jams. The line up was a moment of pride, a job well done after a hot summer of tending and watering. Even now, seeing a canning jar fills me with a craving for something delicious. You may not be the canning type, but you’ll definitely want to pick up some darling ½ pint jars for this recipe. It won’t get you through the long winter months, but it will transport you to a tasty place you’ll want to visit again and again. It’s called Petite Éclairs in a Jar. Believe me, it will top your list of ways to use your jars in years to come.

WB 012

First you’ll need ½ pint jars. I found some in my local grocery store. They’re so cute you’ll want to buy every one in sight, but this recipe will make about a dozen.

Petite Éclairs in a Jar

  • 1-2 sleeves Graham crackers
  • 2 (3¼ oz.) boxes instant French vanilla pudding
  • 3 ½ c. milk
  • 1 (8 oz.) container whipped topping, thawed
  • 1 tub chocolate frosting

1. Make sure your jars are clean and dry. Break graham crackers into small pieces and line the bottom of jars with them. Don’t be afraid to overlap a bit.

2. Mix up the cream. In the bowl of an electric mixer, combine pudding powder and milk, beating at medium speed for two minutes. Fold in thawed whipped topping. Divide cream mixture among jars. Fill about 2/3 to ¾ full.

3. Top with another layer of grahams. Break up here and cover entire surface as well as possible. It will make the next step easier.

4. Finish off with a thick layer of frosting spread across the top like a lid. Use the edge of the jar as your finishing point.

5. Refrigerate for 8-24 hours. I don’t put lids on at first to let the frosting firm up, but after about 6 hours I put the lids on.

6. Serve with a spoon and a sigh of satisfaction for the harvest you’ve created.

Eclairs in a Jar

Bon Appétit!

Christene

button2

Friday, September 10, 2010

Taco Cupcakes

You know as well as I do that most children are picky eaters. My little ones are the exception to the rule! My kids routinely ask me for sushi, mushrooms, white clam linguine, and Greek Dolmas (grape leave wrapped seasoned rice. Looks disgusting but tastes amazing!)

But when I have other children visiting my home, I make this fun meal that everyone is sure to love.  It tickles them pink that they are allowed to eat "cupcakes" for dinner! The best part about this meal is that it’s complete. No side or veggie required, as it already has all the food pyramid requirements!

Cover 

What you will need,

  • 1lb meat of your choice. I prefer ground turkey
  • 1 can of corn, drained
  • 1 chopped onion
  • 2 cans of beans, semi drained. I usually use kidney & chili beans.
  • 1 packet of taco seasoning
  • 1 bunch of cilantro. Rinsed and chopped head to toe.
  • 1 box of corn bread
  • 1 cup of shredded cheese
  • Sour cream optional
  • 1 sleeve of cupcake wrappers

Directions

Make the corn bread as directed on package. Set aside.

WB3 010

Brown your beef with the onion. Stir in water and taco seasoning as directed on packet. Toss in corn, beans, and cilantro. Mix well.

12 3 4

Fill each of your cupcake wrappers half full with the meat and bean mix, and pour corn bread mix on top until it is 3/4 full. Sprinkle shredded cheese on top of each and bake for 20 minutes or until the mix is golden and a toothpick comes out clean.

5

Dollop some sour cream on the top of each if the kids like, and it looks like a real cupcake!

6

Erin

Thursday, September 2, 2010

Peanut Butter Cookie Cheesecake Bonnes Bouches

One of the pleasures of life is to open a brand new jar of peanut butter. The smooth creamy surface, pristine and untouched and smelling so nutty and tempting it’s like a blank canvas. What will become of this little bottle of mushed up nuts? Today you’ll be grabbing one of your favorites for this delicious recipe. I hope you have a jar or two! Get your rubber spatula and let’s dig in!

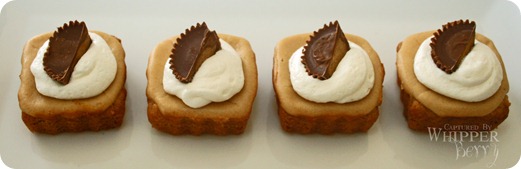
Today we’ll be making Peanut Butter Cookie Cheesecake Bonnes Bouches. Get your mouth around that one! What is a Bonne Bouche? I hear you asking. Yes it is French and translated it means “a delicious morsel or mouthful”. This yummy recipe definitely qualifies. A crumbly peanut butter cookie crust beneath a tender layer of peanut buttery cream cheese filling, topped with whipped cream and half a mini Reeses peanut butter cup. Mmm…let’s get started!
christene 001

Begin by making the peanut butter cookie crust.

Peanut Butter Cookie Crust

Adapted from Soft Peanut Butter Cookie by Natalie Gardner

  • ½ c. butter, softened
  • ½ c. peanut butter
  • ½ c. white sugar
  • ½ c. brown sugar
  • ¼ t. vanilla
  • 1 egg
  • *1¼ c. flour
  • *¾ t. soda
  • *¼ t. salt

1. Cream all but starred items. Sift starred items and add to peanut butter mixture.

2. Using a Tablespoon, scoop dough into well greased mini cheesecake pans. (You want the ones with little lift out bottoms). Don’t overfill! Unfortunately you will have extra dough. I’m sure you can think of things to do with it.

3. Bake in a 350 degree oven for about 5 minutes. The dough will puff up and begin to brown around the edges looking awfully scrumptious.

4. Resist the urge to eat it right now! Instead, use your Tablespoon to press down the puffiness making a well for the heavenly peanut butter filling.

Now, mix up the filling:

Peanut Butter Cream Cheese Filling

12 oz. cream cheese (1 ½ blocks) softened

¾ c. sugar

½ c. creamy peanut butter

2 large eggs at room temperature

¼ c. sour cream

1 ½ t. vanilla

1. Beat cream cheese and granulated sugar in a large mixing bowl with an electric mixer on medium speed until smooth, about 2 minutes. Beat in the peanut butter. Scrape down the sides of the bowl with a rubber spatula, then beat in the eggs, one at a time, making sure each is thoroughly incorporated before adding the next. Finally, beat in the sour cream and vanilla.

2. Use your Tablespoon to fill the wells. Fill straight to the top and pile just a bit on top without going overboard. Your cheesecakes will puff while cooking and then sink down a bit.

3. Put your pans into a 350 degree oven. If you’re using the tiny squares like I did, you’ll have less filling and a wider surface area. Cook for only about 13 minutes until edges are set, but center is still a little jiggly. For the mini rounds, cook at least 15 minutes, but probably more like 17 minutes, watching and testing so as not to overcook. I got nervous and took them out too early resulting in raw centers. Still yummy, but not as good as they could be.

4. Cool on the counter top, then press up from the bottom and lift your little cakes out of the pan. Put them on a plate and into the fridge. I am an impatient woman, but these really are even better if you wait till the second day.

5. Now they’re ready to be properly topped and consumed with relish. You can make your own whipped cream, or use a scoop of Cool Whip to top your cakes. Refrigerate your Reese's Cups to keep them from being too soft and squishing when you slice them. Slice one cup and press it gently into the whip. Voila! You have a fancy bonne bouche that will make you sigh with satisfaction. Now whip a batch for your next party or book club meeting and tell me they don’t go flying off your fancy platter.

Christene

Me and Adelyn Come meet Christene, our newest WhipperChick.  We are so excited to have her join our team!!

Related Posts with Thumbnails